Books are made of paper and so they can be easily damaged. It is just as important to show students how to search and locate a books well as it is to encourage them to make more use of the books in the library. One way to do both is to make sure that students and teachers know all about what a book is and are able to look for book details at the right place on the book.
Tips to help students learn about the parts of a book.
The best method is to give a form lesson. Give each student a book. Then point out the different parts of a book and explain their purpose. Ask students to find the same parts on their own book. Remember to explain the uses of the contents and index pages as these can help students with their studies. Use figure and the information below. For more ideas about library lessons please follow the blog for upcoming blogs.

The parts of a book
• Cover
This can be hard (hardback) or soft (paperback). The cover helps protect the book. Some teacher-librarians like to put an extra cover, which they buy from library suppliers or make from strong paper or sticky-back plastic, on popular books.
• Front cover
This may have a picture on it and usually has the title of the book and the author’s name; it may also have the publisher’s name.
• Back cover
This often has a summary of what the book is about; or it may have some people’s comments about how much they enjoyed the book - these are called reviews. Most back covers list the book’s own internationally recognised ten-digit ISBN, usually nowadays in the form of a computer readable bar code. An ISBN is a computer number used by publishers and booksellers to identify a title. In some large bookshops you will be able to order the books you want if you give the bookseller just this number. However, it is not essential information for libraries without computers.
• Spine
This is the backbone of a book. If it breaks, or is damaged, there is a risk that the book’s pages will fall out. On the spine most books usually have the title of the book and the author as well as a symbol (picture or letters) which identifies the publisher.
• Spine label
All the books in your library should have a spine label, glued or stuck to the bottom of the spine. This will be used by students to locate books they want and to find out if the book is information or fiction; it will also give a visual reminder of what the book is about. If, for example, a student is looking for a biology book, he or she (depending on your classification system) would look for green spine labels or the classification code number 500. (I will post a separate article about classification systems.)
• Title page
This is usually a right-hand page near the front of the book. On it will be the book’s title, author and publisher.
• Title verso page
This is traditionally the left-hand page immediately after the title page. On it will be more information about the publisher (for example, the publisher’s address) and about the book (what year it was published, if it has been reprinted and who printed it). The title verso page will also have details of the book’s copyright.
• School nameplate and return date label
It is recommended that you glue your school nameplate. If the school library does not use a digital automation system (which is strongly recommended) then glue a return date label on to the first right-hand page as you open the book (see below figure). Explain to students that this shows who owns the book and that it is also the place to find out on which date they should return the book if they have borrowed it from the library.
• Contents page
Most information books have a contents page. This gives an outline, or sometimes a brief summary, of what will be in each chapter - and a page number so that you can turn straight to the right chapter. For example, in a book on the lifecycle of a butterfly you might see from the contents page that chapter 1 is on larvae, chapter 2 is on the chrysalis, chapter 3 is on caterpillars and chapter 4 is on butterflies. If you want more detailed information then you should look at both the contents page and the index.
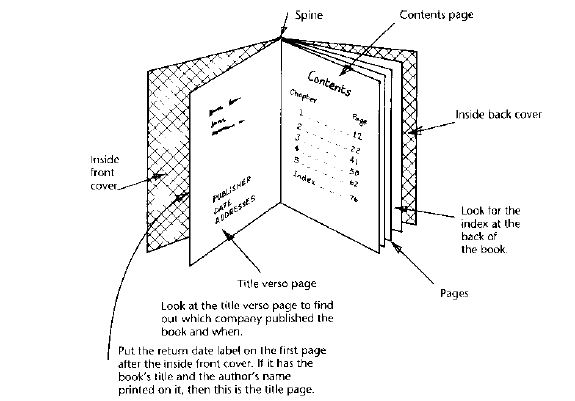
Index
An information book is more useful if it has an index. This is usually an alphabetical list of subjects, people and other important items that are written about in the book, each with a page reference. An index is usually at the back of a book. The page references make it easy for the user to find the information they want. For example, use the index in this book to find out where there is more information about different types of stock. After the word ‘stock’, you will find several numbers. These numbers direct you to the pages in the book which have information about stock printed on them. Make sure your students do not confuse an index with a glossary (or key words section), which lists difficult or foreign words and explains what they mean, but does not give page references.
Before students use the library, we must check that they know what is the front cover, the back cover and the spine; how to tell the title from the author (this can be quite difficult for students); who the publisher is; where to find the publication date and where to find your own library details, like the return date label.
Tips for picking the right book
Students may set a project that asks them one question about how to grow rice, one question on how to make aeroplanes and one question on Nelson Mandela’s work in South Africa.
Explain that if they want quick answers to these questions they need to find a reference book and use the index. In the index they should look for the best possible word that describes the subject they want - (in this case the words would be ‘rice’ ‘aeroplanes’ and ‘Mandela’).
If they want more detailed information they should go to the appropriate bookshelf in the library, and then check the contents and index pages of relevant books.

Comments
Post a Comment